04 Sep How to Change IP Address on iPhone in a Simple and Secure Way
The digital world we live in today makes online privacy and security crucial as data breaches and surveillance become more common. Changing your device’s IP address offers one way to boost your online security and access content that some regions restrict. iPhone users might find this task intimidating, but it’s quite simple. Learning how to change IP address on iPhone can be helpful, no matter why you want to do it. This article will walk you through different ways to change IP address on iPhone, so you can have a safer and more flexible time online.
What is an IP Address?
Before we start learning how to change IP address on an iPhone, it is important to understand it in the first place. This is altogether important for users who don’t understand the meaning of an IP address. Once you have grasped what an IP address is, then only you can change it. So basically, an IP address works like your phone number. However, it serves as a unique identifier that lets devices talk to each other on a network. Now there are essentially 4 types of IP addresses:
- Public IP Address: Firstly, we have a public IP address. Your ISP internet service provider assigns this. This address basically identifies your device across the entire internet. In other words, it is the address of your device across the internet.
- Local IP Address: Then we have local IP address. This is assigned by your home or office router. It is used for internal communication within a local network only.
- Static IP Address: This kind of IP address doesn’t change and stays the same unless you change it yourself. It works great for devices that need a fixed address, such as web servers. You can get a static IP by asking your ISP for one, but you will have to pay for it.
- Dynamic IP Address: A dynamic IP address is given and might change every time you connect to the network. It’s often used for devices like smartphones where you don’t need a constant address. ISPs give out dynamic IPs as standard, so you don’t have to make any special requests or pay more.
Your IP address can give a rough idea of where you are , and sometimes, switching it up can give you more privacy and help keep you safer.
Before proceeding to how do you change ip address on iphone we will first understand why we might need to change it.
How to Change IP Address on iPhone?
Changing your iPhone’s IP address is a straight forward process and can be done either through Wi-Fi settings or by using a VPN. Your choice depends purely on what you need and prefer. Let’s see how to change IP address on iPhone using both methods.
Changing IP Address Using Wi-Fi Settings
If you want to take charge and choose a particular IP address, then this is the perfect method for you to change IP address on iPhone. Given below steps will help you to do so.
Step 1: Connect to a Wi-Fi Network
To start, make sure your iPhone is connected to a Wi-Fi network. You can’t change your local IP address unless you are connected to Wi-Fi.
Step 2: Access Wi-Fi Settings
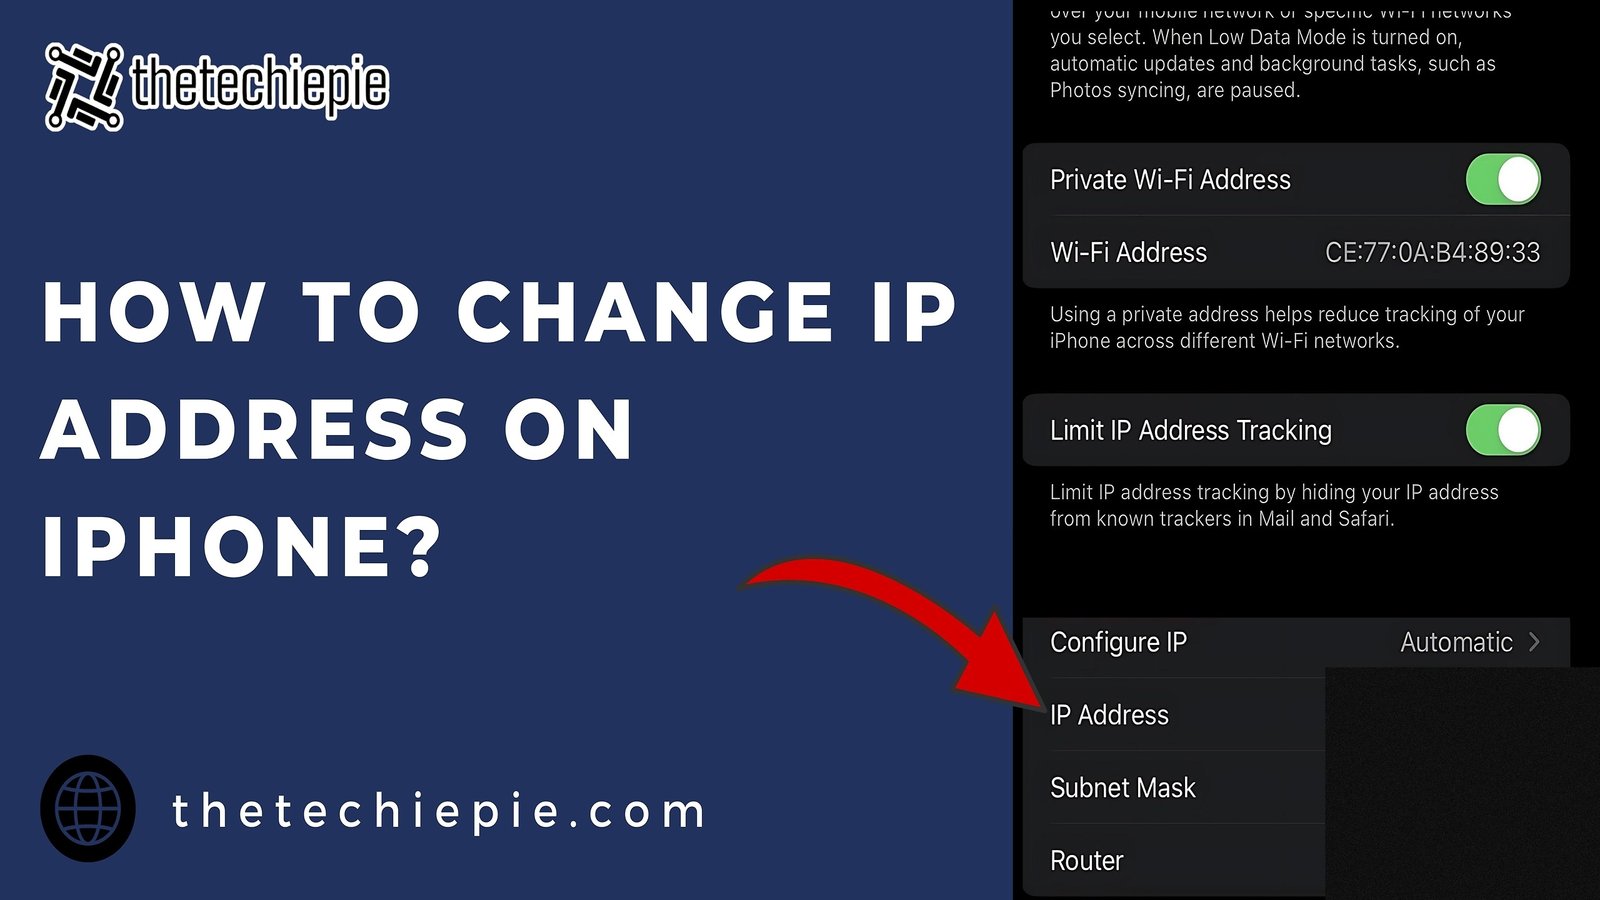
- Next, head over to Settings on your iPhone, and from there select Wi-Fi.
- Now go to your connected network and tap at the small “i”icon.
Step 3: Manually Configure a Static IP Address
- The next step is to choose “Configure IP” and select the “Manual option to change the IP address”. This choice allows you to input a fixed IP address. This address stays the same each time you connect to the network.
- Next, input the new IP address you wish to assign to your iPhone.
- Alongside changing your iPhone IP address, you’ll also need to enter the “Subnet Mask” and “Router” information as well.
More About Subnet Mask and Router IP Address.
- Subnet Mask: This defines the range of IP addresses available on your network. Most often it does not change and is 255.255.0.
- Router: The router’s IP address, typically something like 192.168.1.1, and is basically the network’s gateway.
Step 4: Save the Changes
After you put in the information, hit Save. Your iPhone will then use the specific static IP address you entered.
Methods To Change IP Address On iPhone Using A VPN
A VPN, short for Virtual Private Network, offers a way to create a safe and coded link between your device and the web. Using a VPN means your web activity goes through a private server, which covers up your actual IP address and swaps it with the IP address of the VPN server. If you’re looking to learn how to change IP address on iPhone through VPN, you’ll need to follow these steps.
Step 1: Install a VPN App
To change your IP address using a VPN, you need to install an app first. Start by downloading and setting up a trustworthy VPN application. Some well-known options include
ExpressVPN, NordVPN, and CyberGhost.
Step 2: Connect to a VPN Server
- Once you have installed the VPN app, you must now open the app and sign in.
- Now choose a server from the list of available locations.
- Finally, VPN will connect you to the server you chose. Once your device is connected, to the VPN, your IP address will change automatically. It will be changed to the one assigned by the VPN.
Step 3: Verify the New IP Address
To ensure your IP has changed, you must check it online on an IP address checker website. To do so, go back to whatismyipaddress.com or any such similar website. Now here, check if the displayed iPhone IP address is different from your original one or not.
Why Would You Want to Change the IP Address of Your iPhone?
Changing your iPhone IP address is the fastest way of changing your digital print. Switching your it can greatly enhance your online experience in several ways. Changing the IP address can offer many benefits, including the following:
- Accessing Geo-Restricted Content: Sometimes shows and movies on streaming platforms can be viewed only in a specific area. You can get around these limits and watch what you want by changing your iPhone IP address.
- Improving Privacy: Websites and ad companies often use your IP to gather your data in order to show you related content. To avoid such ads, you can swap your IP address, which helps you stop them from tracking your activities.
- Staying Off the Radar: You can lower the chances of someone watching your activity only. You just have to change your IP address.
- Overcoming Regional Blocks: Similar to some streaming websites, certain websites restricted or blocked their content in specific regions. To watch such content, you can change your IP address, which can give you access to that content.
2 Easy Ways To Find Your Current IP Address on iPhone
If you want to change your IP address, first check your current one and then try to know easy ways to change IP address on iPhone: For this purpose, do the following:
- Public IP Address: Go to a website like whatismyipaddress.com to see your public IP address.
- Local IP Address:
- First open your iPhone’s Settings.
- Then tap on Wi-Fi
- Next, you will see a little i icon next to the network you’re connected to.
- Now tap the “ i” icon and look down the list to find your local IPv4 address.
5 Most Common Troubleshooting Issues
Checking for errors is equally important to understanding how to change IP address on iPhone. If you’re encountering problems changing your IP address, you must try these solutions:
- Turn Your Device or Router Off and On: Giving your iPhone or router a quick restart often fixes IP problems by giving the connection a fresh start. This is the first simple step you can try to change IP address on your iPhone.
- Make Sure Your Internet is Working: Having a good WiFi or mobile data signal helps keep your network steady, which makes it more likely you’ll be able to change your IP.
- Look at Your VPN Settings: Check again that your VPN is hooked up to the right server and get the latest version of the app to help your IP switch without a hitch.
- Take Another Look at Static IP Settings: Put in the right static IP info and pick an IP address that no other device is using to avoid mix-ups.
- Get in Touch with Support: If nothing else works, calling your internet company or VPN provider can help sort out trickier IP issues fast.
Conclusion
Changing your iPhone’s IP address isn’t rocket science and can boost your online privacy. It also lets you see content from other parts of the world. This guide has shown you how to change IP address on iPhone, whether you want to tweak your Wi-Fi settings or use a VPN. Just remember to stick with VPNs you can trust to keep your data safe and make sure you’re browsing without any worries.
FAQ
- Can I change my IP address on my iPhone without a VPN?
You can change your IP address by tweaking your iPhone’s Wi-Fi settings or using a proxy server.
- Is it safe to change my IP address?
Yes, changing your IP address is safe. However, you must use a reliable method, such as a trusted VPN or proper settings adjustment.
- Can I change my IP address to access geo-restricted content?
Many people use VPNs to change their IP addresses to get around geographic content restrictions.
No Comments