
10 Sep Ear Piercing Chart: A Guide to Stylish and Safe Ear Piercings
Have you ever thought about which ear piercing matches your style? With so many options and trends, naturally picking the right one can feel overwhelming. Fortunately, our Ear Piercing Chart is here to help you through the process. We will make sure you choose something that looks good and at the same time is safe as well. From lobes to helixes, you’ll find out about different types of piercings coupled with tips on how to choose one. So say goodbye to being unsure and hello to beautifully adorned ears.
What are the Different Types of Ear Piercing?
Before you start learning about ear piercing charts, you should know about different types of ear piercing. This is because, with a plethora of ear-piercing styles to choose from and so many names, often people get confused. So it’s essential to know about each piercing type. This will accordingly help you make the best decision both for your looks as well as the comfort level.
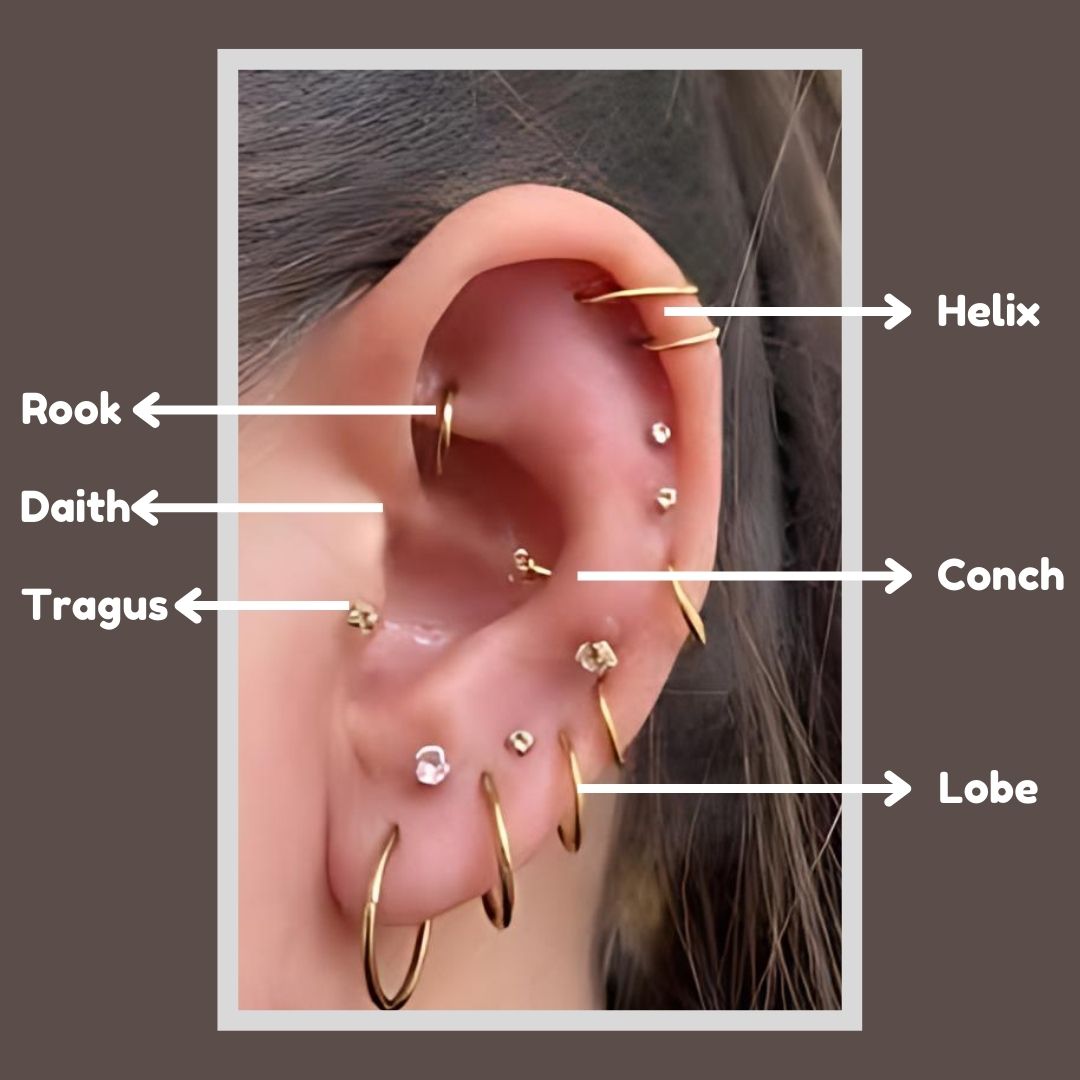
Lobe Piercings
To start with, the first type in our ear piercing guide is lobe piercing. It nevertheless tops the list as the most common type and usually is the first one for many of us. Lobe piercing is usually a go-to choice for newcomers. The reason for this is that earlobes have soft tissue, so it is less painful to get them pierced. Moreover, with this lobe piercing, you can experiment with a broad selection of jewelry ranging from basic studs to fancy dangles.
Transverse Lobe Piercing
Next on the list is the transverse lobe piercing. For this type of piercing the earlobe is pierced from side to side. So unlike standard lobe piercing, which is a front-to-back approach, this type of piercing has holes running side to side. This distinctive style shows visible balls on each side of your earlobe. Of course it looks quite trendy.
Tragus Piercing
Now, let’s move on to tragus piercing. The tragus is a tiny cartilage flap that shields your ear canal. So in this type of piercing, you pierce this spot with a stud or a hoop. You should, however, keep in mind that it often hurts more than getting your earlobe pierced because of the cartilage in the tragus.
Anti-Tragus Piercing
You’ll find the anti-tragus piercing on the cartilage ridge right above your earlobe. This spot works well for hoops or barbells. However, be prepared, as it can be more uncomfortable than other piercings. If you already have other earrings, make sure there’s enough room for this placement before you go for it.
Snug Piercing
The next one is the snug piercing. It sits above the anti-tragus area, which makes them stand out. But this type of piercing is not suitable for every ear. This is because not every ear has enough room to accommodate a snug piercing, so you should check with your piercer beforehand.
Rook Piercing
Rook piercings penetrate the cartilage in the top section of your ear close to the daith region. This piercing sits on the ridge that separates the outer and inner upper ear and usually sports a barbell or hoop. The healing period, however, can last from six to twelve weeks.
Conch Piercing
You can get a conch piercing on the upper or lower part of your ear’s conch. This piercing goes through thick cartilage, which naturally makes it hurt more. More so ever, it needs more time to heal, often around six to nine months.
Daith Piercing
Daith piercings sit in the cartilage inside the innermost ear with a hoop. Also, it is believed that this type of piercing cures migraines. Therefore, some folks choose this piercing to help ease their migraine pain.
Helix Piercing
Next up is the helix piercing. You’ll find helix piercings on the upper cartilage of your ear, making a bold statement. More and more people now go for this spo as it lets you pick from lots of jewelry options.
Forward Helix Piercing
Forward helix piercings, on the other hand, go on the upper cartilage close to your face. However, they often take quite some time to heal, around three to nine months on average. After that, though, you’ll find them easy to keep up with.
Orbital Piercing
In an orbital piercing, the two separate holes are joined by one jewelry piece, usually a rong or hoop. Additionally, you can choose to place orbital piercings in different spots, from the helix to the rook or the tragus to the conch.
Industrial Piercing
An industrial piercing puts two holes linked by a barbell in your upper ear cartilage. This is somewhat similar to orbital piercing, with the only difference that it uses a circular barbell as a piece of jewelry.
Having understood about the different types of piercing, it’s now time to understand the exact thickness of each type. This will help guide you in choosing which piercing you should opt for.
Ear Piercing Chart & Piercing Guide
An ear piercing chart typically lists down the recommended thickness (gauge) and length (millimeters) of jewelry for different piercings. This will ultimately help you in picking the right one for you. So, without further ado, here is the ear piercing chart for the hoop and stud size guide , which will be your go-to reference.
| Piercing Location | Thickness (Gauge) | Hoop Length (mm) | Stud Length (mm) |
| Lobe | 20G /18G /16G | 6mm / 8mm / 10mm | 6mm / 8mm |
| Helix | 18G / 16G | 6mm / 8mm | 6mm / 8mm |
| Rook | 18G / 16G | 6mm | N/A |
| Daith | 16G | 8mm / 10mm | N/A |
| Forward Helix | 18G / 16G | 6mm | 6mm |
| Conch | 16G | 10mm / 12mm | 8mm / 10mm / 12mm |
| Tragus | 18G / 16G | 4mm / 6mm | 6mm |
This ear piercing chart is specifically designed to simplify the information for you. Now you can easily compare different piercing locations, thicknesses, and sizes for hoops and studs. However, as each piercing is unique, consult with your local piercer if you’re unsure about cartilage earring sizes.
How to Measure Your Piercing Jewelry?
We are confident that the above ear piercing map will help you understand the right size of your jewelry. But wait, there’s more! Is there a way by which you can measure the right size at home? Absolutely! Measuring your piercing jewelry at home isn’t as hard as you might think! In fact, you can get the right size for your huggie hoop earrings or piercing studs with just a few things you have around the house. Here’s exactly what to do:
Measuring for Hoops
First, find a small strip of paper, a marker, and a ruler. Next, begin by putting the edge of the paper against the outer edge of your ear, and extend it toward your piercing. Mark the spot where your piercing is on the paper. Then, use your ruler to measure this distance in millimeters. To get a snug fit, add 1mm to what you measured, or 2mm if you want it a bit looser.
Measuring for Studs
Similarly, to measure studs, grab a regular earring post and put it in your piercing. Make a mark on the post where you want it to end. Afterwards, take it out and use a ruler to check how many millimeters long the marked part is. If you’re not sure, go a bit longer to make sure it’s comfy.
Which Things Should Be Kept in Mind While Ear Piercing?
To keep your piercings in top shape in the first place, you need to understand the ear piercing chart. Then is equally important to get your cleaning routine right. Therefore, to focus on the style, safety, and comfort, you should keep following things in mind:
- Choosing a Professional Piercer: First and foremost, picking a licensed, skilled piercer is the key. This is essential, as a good technique and clean conditions can lower the risk of problems.
- Safety: Secondly, safety should be your main concern when thinking about a piercing. Henceforth, following key safety practices is essential to a healthy piercing experience.
- Aftercare Routine: Finally, after you get your ears pierced, following an aftercare routine is equally important. A proper aftertreatment helps to prevent infections and has an influence on healing. Further, it’s crucial to clean with mild solutions that don’t have fragrances. Also keep in mind that unless you don’t avoid messing with the area, it won’t heal soon.
Conclusion
To sum up, keep in mind that the Ear Piercing Chart isn’t just a guide. In fact, it’s your roadmap to make stylish and safe choices. In the light of insights gained from this guide, you can check out new piercing styles while putting safety first. Now that you have this knowledge, you can make a clear and informed decision about your next piercing. So go for it, try new styles, and let your ears share your unique story.
FAQ
- What is an Ear Piercing Chart?
An Ear Piercing Chart shows you where different ear piercings go on your ear. It helps you pick a piercing style you like.
- How can I use an Ear Piercing Chart?
You can look at an Ear Piercing Chart to choose an ear piercing that fits your style. It also makes it easier to tell your piercer where you want your new piercing.
- Are all ear piercings safe?
Most ear piercings are safe when a professional piercer does them using the right methods and clean tools, but you can still get an infection or have problems.
No Comments